Wolfman Mixed Media
Hidy ho guys!, It's been a while since I've done one of these WIP blog posts hasn't it!..
Thought this might be an interesting one to do, as I experimented with many different combinations of mediums and techniques that I have been developing for a larger painting, in this little test piece.
Importance was placed in achieving the desired look in the most archival manner possible while still limiting my exposure to noxious media as much as possible.
To do this I thought it would be a good idea to try to use watercolour for the base thin fluid layers.
 |
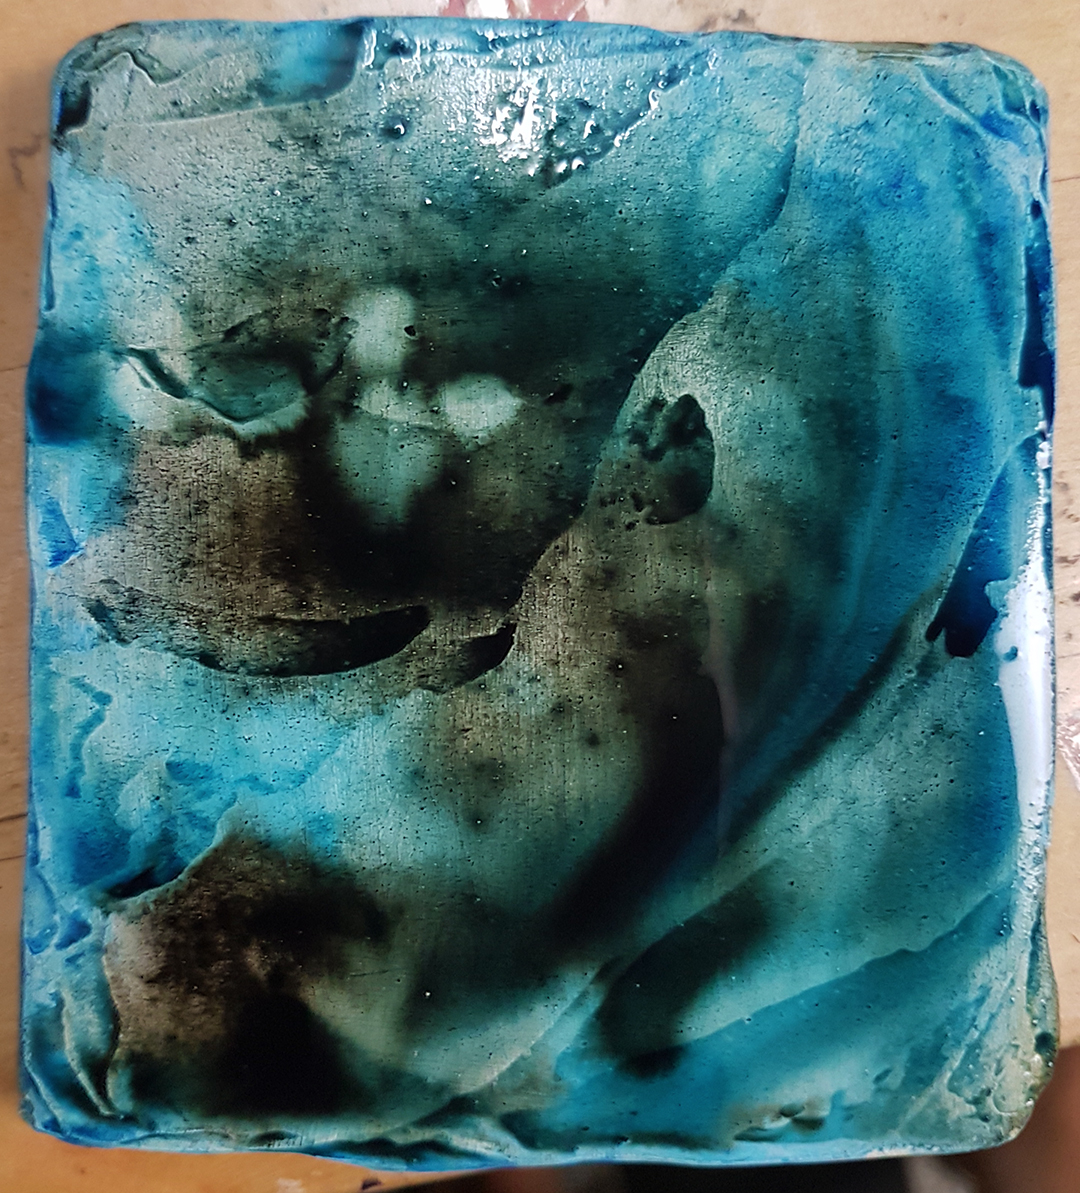
| This little 3.1 x 3.4 Inch piece was an exact size crop of a part of the larger painting. (since then I've changed the composition of my final painting, so this is not the case anymore!) |
This piece consists of a mix media of:
W&N Watercolour,
Waterproof W&N Black India Ink
Derwent Charcoal Pencil (Dark)
W&N Oil & Alkyd Paint
Gold Metal Leaf
The Ground
The watercolour required a more absorbent ground that would hold the watercolour pigment better than just plain gesso alone, so after a bit of research and experimenting I decided on a mixture of :
50% diatomaceous earth and 50% W&N Artists Gesso (water based of course)
 |
| Primer: 50% Diatomaceous Earth + W&N Artist's Gesso Toned with very thin Raw Umber Acrylic. |
This mixture was applied with a pallet knife to achieve the lovely knife texture I just love and regularly use as a ground for my paintings..
Underpainting
The ground was left to dry for at least two days, then lightly sanded, before applying this lovely aqua marbled effect in watercolour.
Watercolour palette for this base:
Phthalo Blue, Yellow Ocher, Burnt Sienna
and a drop of W&N Black Indian Ink.
 |
| Still Wet! |
Prepping for the Figures.
Now here I screwed up a bit as I left the watercolour to dry for far too long (several days) when I should have done this immediately once it was touch dry.
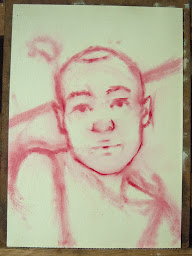
At this point I traced the preliminary drawing on with white pastel and was then meant to remove most of the watercolour paint within the figures.
 |
| The watercolour was removed as much as possible, with water and a stiff hog bristle brush (dabbing with tissue as I went) |
However the watercolour had become to tough to remove now, so I decided to try something else I had actually mulled doing before for this stage, and that was going in with some pure white diluted gesso.
 |
| The diluted gesso was painted in several layers to achieve the desired fluid, semitransparent effect (more opaque in some parts than others for a dimensional look). |
The diluted waterbased gesso was applied to just the figures.
This layer of gesso was then left to dry for a day or two before the next stage.
Base Hues for the Figures
Gradients of golden brown hues of watercolour were then applied over this white gesso for the figures skin tones.
Watercolour palette for skin:
raw umber, burnt sienna and even a touch of the black India ink.

Starting the Gold Leaf Gilding!
Now let me remind you this was an experimental piece and this is one step I found, would have been best left to a later stage of the painting.
(Somewhere near the last touch up stages of the oil paint, would have been better, me thinks)
Gilding materials :
Gede Gold Metal Leaf & Waterbased Gede Gilding Paste.
The design was painted with the gilding paste and left to dry for about 5 - 10 minutes (it's hot here so it might take a bit longer depending on your climate)
At this point the paste was tacky enough to lay on the gold leaf, with a light burnish of the finger.


This was left to dry for a day, before brushing off the access gold leaf, and tiding up the edges with a sharp blade.
Introducing the Oil based Mediums
(at this point I ceased using any other waterbased media)
I was super excited about this next stage as I had taken ages to find a way to achieve this precise look with the gold leaf..
I wanted an irregular sized gold fleck effect, and in the end I found a super easy method inspired by how gold leaf powder is made.
(note* this is also a step I wish I had left to the last stages of the painting as well. Indeed I had to redo it after the last oil paint layer, as most of the previous gold flecks had been covered with paint by then)
Oil based mediums are now introduced in to the piece by applying a very thin layer of :
Liquin + Stand oil + Turpentine (1:1:1)
on just the areas I wanted the gold flecks to be.
A small piece of gold leaf was then dabbed on to this sticky surface, causing it to break apart and distribute itself in irregular sized gold dust flakes as I dabbed all over the areas I wished the flakes to be.
 |
| Dabbing the gold leaf on with my finger tip. |
I had to be careful not to do this too much as the gold leaf would become too fine for the effect I was after.
The Liquin + Stand Oil medium, once dry, would have the extra benefit of being a protective layer over the gold metal leaf too.
Charcoal and Applying Protective Waterproof Layer over Watercolour!
To protect the watercolour toned ground I applied a thin layer of the same Liquin + Stand oil + Turpentine mix to all other parts of the painting now.


It was important that this layer of medium was really thin as, with all oil based mediums, it would slightly yellow in time ( I feel a very slight yellowing patina will look quite nice on this piece, so didn't mind this eventuality here). To limit this as much as possible, the excess was lightly wiped off with a tissue, while still leaving enough to fix/hold the charcoal pencil used in the next step.
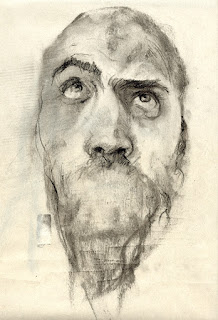
Next while the Liquin + Stand Oil mix was still wet, I went in with a charcoal pencil to sketch in some gesturally expressive lines.

The rougher diatomaceous earth + gesso ground helped create a surface conducive to drawing with charcoal.
Once dry, the Liquin + Stand oil mix worked great at fixing the charcoal completely, so that it did not budge one bit in subsequent layers of paint.
 |
| This was left to dry a day or two before the oil paint layer that came next! |
Oil Paint!
So there are two versions here. After the first oil paint layer I decided to see if I could scrap off the paint that was covering the golf flakes, with.. disastrous results, rubbing off too much, that I had to repaint the skin all over again.
 |
| The first attempt was done with more colourful contour lines. |
 |
| Painting in the red feather... |
In my second attempt, I decided to test out painting it slightly differently so I could compare the new version with the previous attempt, and decide on what would be most appropriate for the larger final painting.
 |
| Wolfman all complete after 2nd oil paint layer and added gold flakes. Size: 3.1 x 3.6 Inches. |
Once the paint was completely dry, I then reapplied more gold flakes on top, using the same method I had done before... and it was done!!
Complete with a nice layer of retouch varnish!
Tonnes was learnt with this test piece. A testament to why I always do them, especially as I seem have to try something new with almost every new piece I do!..
I realized this colour palette wouldn't be right for my final painting and that I think I'm going to forgo the watercolour and charcoal pencil too for the final. As for which oil paint style I preferred for the skin in the end... I'm leaning towards the way I painted the second oil paint layer for the final too!
This original piece won't be available quite yet as I will need it as reference as I paint the final piece.
Ta guys!.. :D


Comments
Post a Comment